Previously, I posted a guide to creating and deploying a very simple custom Association form for a MOSS workflow. This time, I will walk through the steps to create a custom Initiation form, and also a bit of detail on consuming the data from the Initiation form from your workflow code. To reiterate what I said in the Association form walkthrough, what I am creating here is not a form you would use in a real workflow – the intent is to demonstrate the process with as much noise and detail stripped away as possible.
As I describe in my other post, the Association form is displayed when you connect your Workflow Template to a document/form library, list, or content type (the action known as creating an association). The Initiation form is displayed when the user actual starts or instantiates the workflow on an item in a list or document library. The intent is to collect startup information for the workflow. The information collected by the Instantiation form may be the same as on the Association form (allowing the user to override the defaults) or it may be completely different information. Have a look at http://msdn.microsoft.com/en-us/library/ms481192.aspx if you would like to see Microsoft’s definitions.
Before we start, have a look at my previous post describing my base environment for creating these examples.
1) Create a new site
I used a new web application, and a new site collection created using the Team Site template. I named my site InitiationFormDemo;
2) Create Form Library
On this new site, create a Form Library (which I named Workflow Form Library);
3) Create Task List
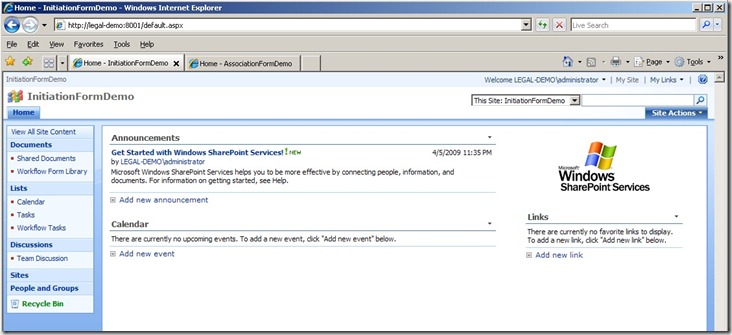
Also create a new Task List. I called mine Workflow Tasks. At this point, your site home page should look something like the picture below.
4) Create Workflow Project
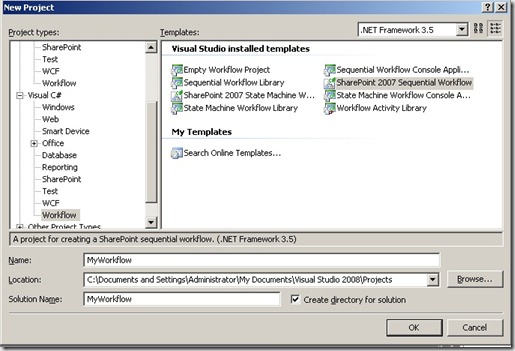
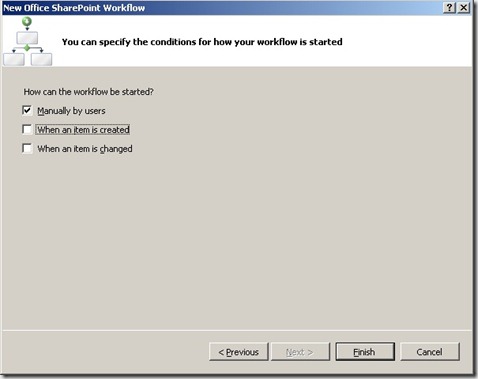
Launch Visual Studio 2008. Create a new project. Expand the C# project tree, select Workflow, and select the SharePoint 2007 Sequential Workflow. Name the project “MyWorkflow”. The create project dialog should look like the picture below.
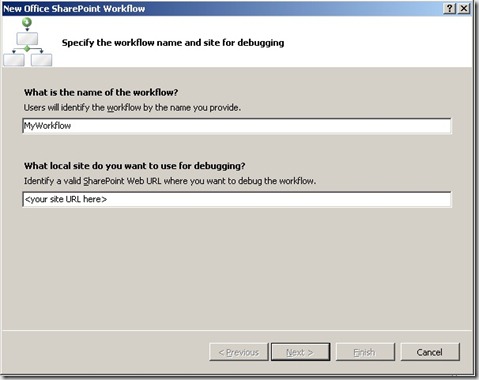
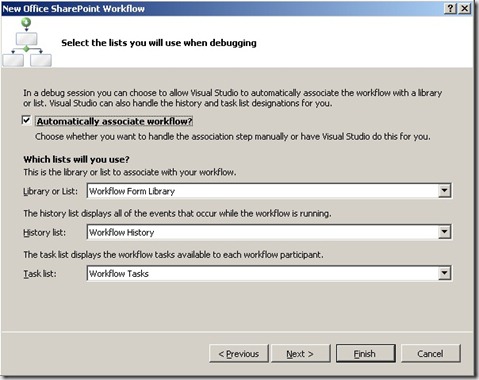
5) Set the properties for the project as shown below
6) Finish Creating Workflow Project
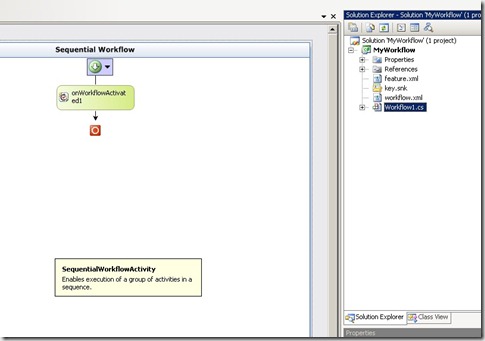
Click finish. Normally, we would change the workflow name in the project, add some activities, some code, etc., but this is not necessary for this example. The project should look something like this.
7) Create Custom Initiation Form in InfoPath
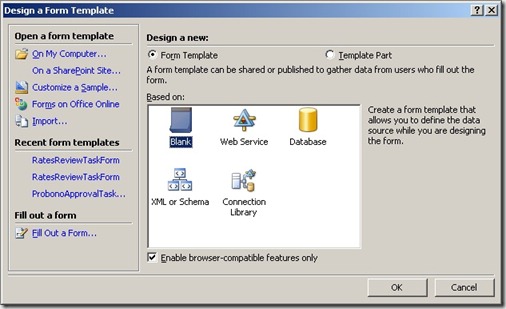
Now we will create the InfoPath Initiation Form. Launch InfoPath and select Design a Form Template. Select the settings as shown below (Form Template, Blank, Enable browser-compatible features only).
8 ) Design the Custom Initiation Form – Create Data Source for Submission
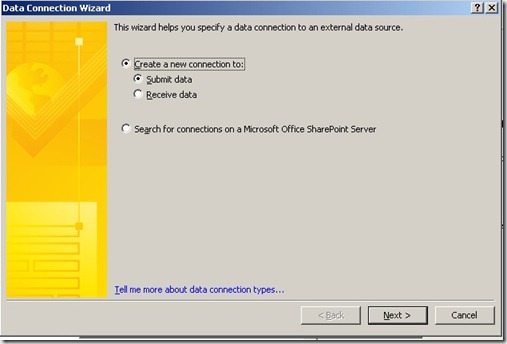
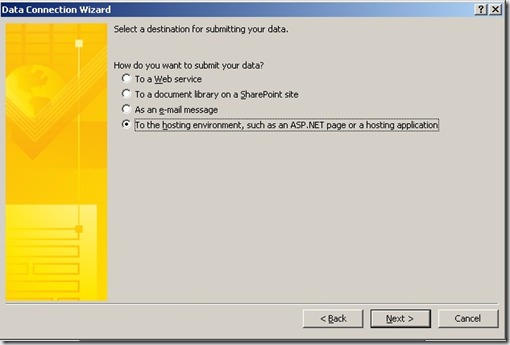
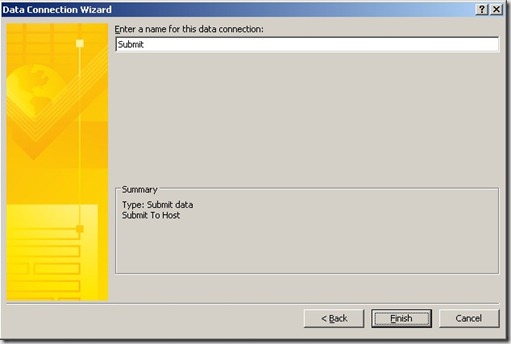
In the InfoPath Designer, select Tools | Data Connections… and click the Add button. Create the new data connection as shown in the following pictures.
Click Finish and Close to get back to the main InfoPath window.
9) Create a Custom Field for the Form
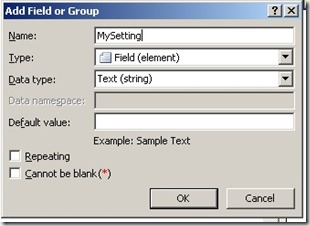
In the Task Pane, under Design Tasks, click on Data Source. Right click on myFields, and select Add to add a new field to the schema. Create a new field as shown below, and click Ok.
10) Add the Custom Field to the Form
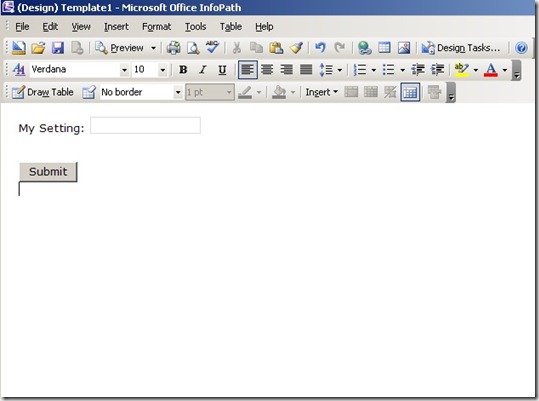
Drag and drop the My Setting field onto the design surface, to create label and text box for it. Also add a Button control, and change its label to “Submit”. Your form should look something like the picture below.
11) Add Logic to the Submit Button
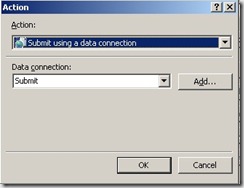
Double click on your Submit button to display the Button Properties dialog. Click on the Rules… button, and click Add and then Add Action. Select options as shown below, and click Ok.
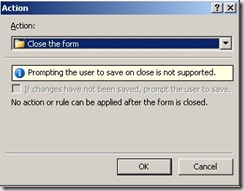
Click Add Action again, and set the options as shown below, and click Ok.
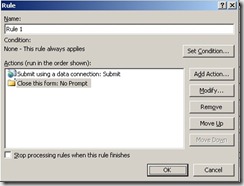
You should now have two actions, as shown below.
12) Set Form Security Level
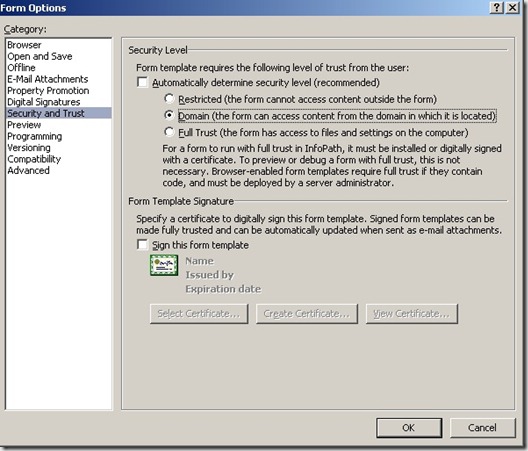
Finally, we must set the form trust to Domain. Select Tools | Form Options…, and select Security and Trust. Unselect the checkbox Automatically determine security level (recommended), and click the Domain radio button, as shown below, and click Ok.
13) Save the Form Template
Save the form to disk (File | Save). You can save it anywhere you want, as long as it is not your Visual Studio project folder. I just save mine to a Forms folder in My Documents. Name the form MyInitiationForm.xsn for this example (in practice you can name it whatever makes sense).
14) Publish the Form Template
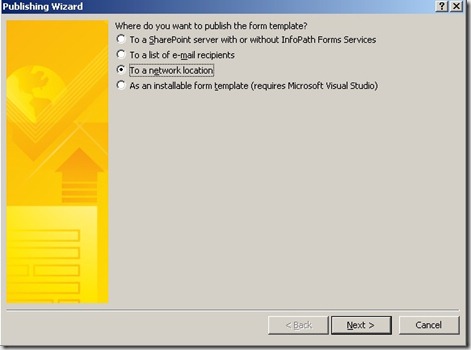
Now we want to publish the form. This did not entirely make sense to me, but when you select File | Publish…, on the first page of the publish dialog we will select To a Network Location even though we will actually publish it to our Visual Studio workflow project folder.
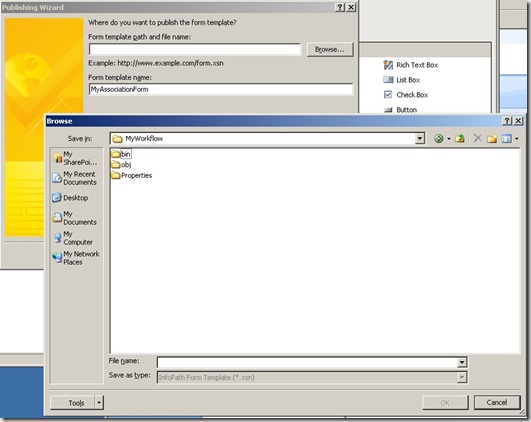
Click Next, and then browse to the location where you will publish the form. In this case, we want to publish to your workflow project folder, as shown.
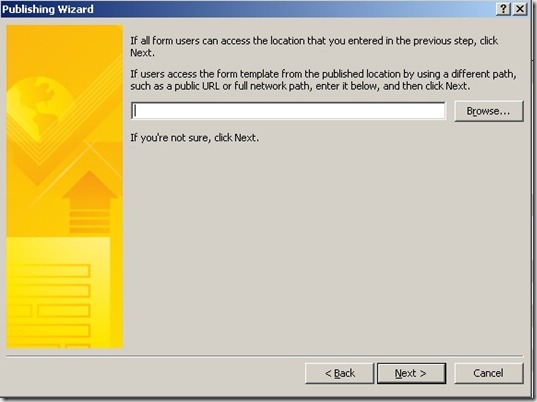
Type a name for your form (I used MyInitiationForm.xsn), click Ok, and Next. On the next form, clear the text box and click Next (this is important, the form will not work if you do not clear that text box!)
When you click Next, a warning will pop up, as shown below. Click Ok to continue.
Click Publish and Close, and then exit InfoPath.
15) Retrieve Form ID to Use in Workflow Project
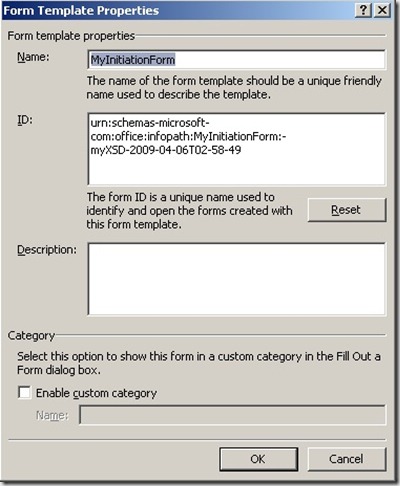
In Windows Explorer, navigate to your workflow project folder, right click on the InfoPath form you just published there, and select Design. When the form opens in design mode, select File | Properties… to display the properties dialog shown below.
Select the ID as shown, and copy it to the clipboard. Click Ok and exit InfoPath.
16) Modify Workflow Project to Reference Custom Initiation Form
Go back to Visual Studio 2008, and open you workflow project if it is not still open. Open the workflow.xml file. The default file looks like this:
<?xml version="1.0" encoding="utf-8" ?>

<!-- Customize the text in square brackets.
     Remove brackets when filling in, e.g.
     Name="[NAME]" ==> Name="MyWorkflow"
 -->

<Elements xmlns="http://schemas.microsoft.com/sharepoint/">
   <Workflow Name="MyWorkflow"
             Description="My SharePoint Workflow"
             Id="0d94af3a-45e7-4035-b351-9a10fc41018d"
             CodeBesideClass="MyWorkflow.Workflow1"
             CodeBesideAssembly="MyWorkflow, Version=1.0.0.0, Culture=neutral, PublicKeyToken=96c40524715e44e9">

      <Categories/>
      <MetaData>
         <!-- Tags to specify InfoPath forms for the workflow; delete tags for forms that you do not have -->
         <!--<Association_FormURN>[URN FOR ASSOCIATION FORM]</Association_FormURN>
         <Instantiation_FormURN>[URN FOR INSTANTIATION FORM]</Instantiation_FormURN>
         <Task0_FormURN>[URN FOR TASK (type 0) FORM]</Task0_FormURN>
         <Task1_FormURN>[URN FOR TASK (type 1) FORM]</Task1_FormURN>-->
         <!-- Modification forms: create a unique guid for each modification form -->
         <!--
         <Modification_[UNIQUE GUID]_FormURN>[URN FOR MODIFICATION FORM]</Modification_[UNIQUE GUID]_FormURN>
         <Modification_[UNIQUE GUID]_Name>[NAME OF MODIFICATION TO BE DISPLAYED AS A LINK ON WORKFLOW STATUS PAGE</Modification_[UNIQUE GUID]_Name>
         -->
         <StatusPageUrl>_layouts/WrkStat.aspx</StatusPageUrl>
      </MetaData>
   </Workflow>
</Elements>
Paste the ID from your InfoPath form properties into the <Instantiation_FormURN> element, and uncomment the element (be careful that the other commented out elements stay that way – or delete the ones you are not using as I did):
<Instantiation_FormURN>urn:schemas-microsoft-com:office:infopath:MyInitiationForm:-myXSD-2009-04-06T02-58-49</Instantiation_FormURN>
Of course, your actual URN will be different than mine.
Add the following new attribute to the <Workflow> element:
InstantiationUrl="_layouts/IniWrkflIP.aspx">
Your workflow.xml file should now look something like this:
<?xml version="1.0" encoding="utf-8" ?>
<!-- Customize the text in square brackets.
     Remove brackets when filling in, e.g.
     Name="[NAME]" ==> Name="MyWorkflow"
-->
<Elements xmlns="http://schemas.microsoft.com/sharepoint/">
   <Workflow Name="MyWorkflow"
             Description="My SharePoint Workflow"
             Id="0d94af3a-45e7-4035-b351-9a10fc41018d"
             CodeBesideClass="MyWorkflow.Workflow1"
             CodeBesideAssembly="MyWorkflow, Version=1.0.0.0, Culture=neutral, PublicKeyToken=96c40524715e44e9"
             InstantiationUrl="_layouts/IniWrkflIP.aspx">
      <Categories/>
      <MetaData>
         <!-- Tags to specify InfoPath forms for the workflow; delete tags for forms that you do not have -->
         <Instantiation_FormURN>urn:schemas-microsoft-com:office:infopath:MyInitiationForm:-myXSD-2009-04-06T02-58-49</Instantiation_FormURN>
         <StatusPageUrl>_layouts/WrkStat.aspx</StatusPageUrl>
      </MetaData>
   </Workflow>
</Elements>
Save the file and close it.
17) Make Sure the Custom Initiation Form will get Copied With the Workflow Feature
Next, open the feature.xml file. It will look something like
<?xml version="1.0" encoding="utf-8" ?>
<Feature Id="15fdd97f-db32-44c1-96cc-cab49acecd36"
         Title="MyWorkflow feature"
         Description="My SharePoint Workflow Feature"
         Version="12.0.0.0"
         Scope="Site"
         ReceiverAssembly="Microsoft.Office.Workflow.Feature, Version=12.0.0.0, Culture=neutral, PublicKeyToken=71e9bce111e9429c"
         ReceiverClass="Microsoft.Office.Workflow.Feature.WorkflowFeatureReceiver"
         xmlns="http://schemas.microsoft.com/sharepoint/">
   <ElementManifests>
      <ElementManifest Location="workflow.xml" />
   </ElementManifests>
   <Properties>
      <Property Key="GloballyAvailable" Value="true" />
      <!-- Value for RegisterForms key indicates the path to the forms relative to feature file location -->
      <!-- if you don't have forms, use *.xsn -->
      <Property Key="RegisterForms" Value="*.xsn" />
   </Properties>
</Feature>
Find the <ElementManifests> tag, and under that, add a new <ElementFile> element inside it as shown:
<ElementManifests>
   <ElementManifest Location="workflow.xml" />
   <ElementFile Location="MyInitiationForm.xsn"/>
</ElementManifests>
Save the file and close it.
18 ) Rebuild your workflow solution, and deploy it.
19) Test it Out
Back in IE, navigate to your form library. Since I’ve not created a custom association form in this example, you can create the association using the default form (if you have set up your project to auto-associate, you will not need to do this manually).
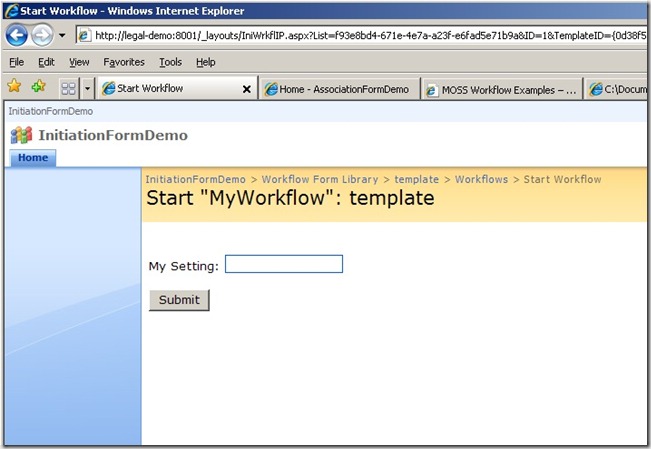
Since we want to initiate a workflow, first we need to add a document to the library. I just clicked upload and selected a random file from my desktop. Hover over the file you uploaded and left-click to bring up the context menu. Select Workflow from the menu. Then click on MyWorkflow to start the workflow. This should bring up your custom instantiation form as shown below.
Enter some text, and click Submit. You will see an animation showing that MOSS is working, and then you will be brought back to the Form Library page. The status of your workflow should show as complete, since the workflow does not actually do anything.
20) Accessing the Initiation Form data in your workflow
I will now quickly show how to access your initiation data from your workflow. We will simple pull out the string entered and log it.
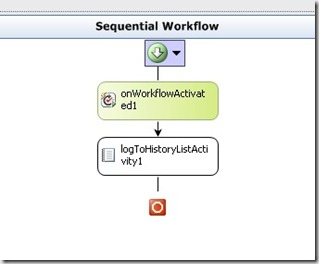
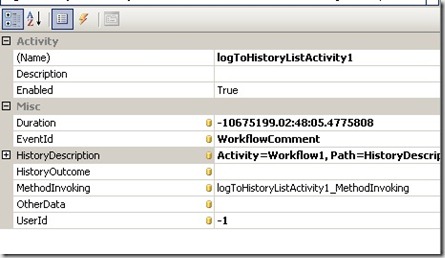
Open your workflow project in Visual Studio, and open your workflow in design view. Add a new logToHistoryListActivity as shown below, and set the HistoryDescription property as shown (set it to a String Field named HistoryDescription in your workflow).
Right click your logToHistoryListActivity and select Generate Handlers. In the event handler, add code as show below:
public String HistoryDescription;
private void logToHistoryListActivity1_MethodInvoking(object sender, EventArgs e)
{
      String MySettingValue = workflowProperties.InitiationData;
      HistoryDescription = "Initiation String Entered: " + MySettingValue;
}
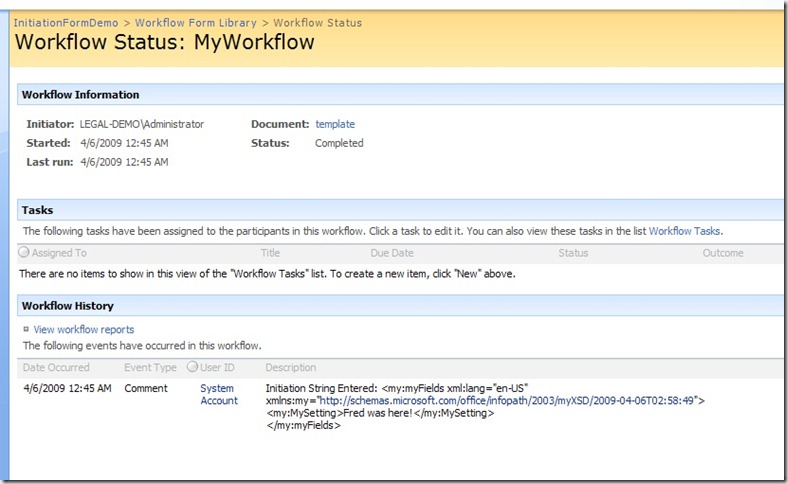
Rebuild and deploy your workflow, and execute it as in Step 19. Click on the Completed link as shown below.
In the Workflow Status you will now see a history event as shown below, and the initiation string is shown as an XML string, with a <MySetting> element and the string I entered. To use this data in a workflow, you would parse the XML and go from there (or generate a class from the schema and load the XML into that).
Well, there it is. A custom Initiation form using InfoPath.
Next time – custom Task forms!


I have assinged the security level as Domain. After closing and opening the Form it shoots an error message (This form cannot be opened because it requires the domain permission level and it currently had restricted permission)
LikeLike
Sorry you really didn’t show how to actually parse this data in the form. I was hoping to actually do somthing with this info…not just add it to a log.
LikeLike
Hi Hikmer – you are right, I am not doing anything with the initiation data here. I do have another post (https://fyeomans.wordpress.com/2009/07/29/working-with-association-data-in-moss-workflows/) that shows a (very) simple example of actually parsing the association or initiation data. I hope that helps.
Fred
LikeLike
Hi,
Is there a way to employ more tha one instantiation Form in a workflow?
Shiva
LikeLike
I am not clear on what you are trying to accomplish here…
If what you mean is “can I have two DIFFERENT instantiation forms, of which one or the other is used depending on context, I do not think that is possible, but you might be able to fake it in your InfoPath form design (i.e. have one form, but have its display customized based on context).
If what you are trying to accomplish is more of a “wizard” type of approach, where you have a sequence of forms collecting information rather than one big form, I again think you could fake this through your InfoPath form design (or, you could probably do something a little more elegant if you implemented the instantiation form in ASP.NET rather than InfoPath.
This is not something I have played with, but it would be interesting to try.
cheers
Fred
LikeLike
Thanks, i have a problem, when i clicking on MyWorkflow to start the workflow, i received “page not found”, do you have any idea?
Thanks.
LikeLike
Is this error coming up before you see the Initiation form?
If so, I would suspect a typo in the workflow.xml file, where you set the InstantiationUrl. This is the URL of the actual ASP.NET page which is displayed and which hosts your InfoPath form. So if there is a typo in the url for that page, you would get a “page not found”.
Make sure it is set as
InstantiationUrl=”_layouts/IniWrkflIP.aspx”
and watch for case errors, and mixups between I’s, l’s and 1’s (I mention that because I screwed it up several times :-))
LikeLike
Thanks, It’s work fine.
LikeLike
Thanks! Nice quality and it’s been very helpful to me.
There’s a small typo on:
IntantiationUrl=”_layouts/IniWrkflIP.aspx”>
It’s missing the S in InStantiation 🙂
LikeLike
Thanks for the feedback. Glad it was helpful.
LikeLike